
Intro
I used to pay for AC tune-ups every year — until I realized that most of what the pros do, you can easily do yourself.
And no, you don’t need to be handy. I learned everything — changing filters, clearing drain lines, cleaning coils — in a single weekend. Now I save almost $300/year with just 2 hours of effort. That’s like earning $150/hour tax-free!
In this guide, I’ll walk you through how to do your own AC maintenance step by step, from the tools you’ll need to common mistakes to avoid.
We use affiliate links in our articles to cover site expenses. If you use these links to buy, thanks in advance for your support!

Why I Started Doing My Own AC Maintenance
I used to shell out $150 twice a year for a HVAC company to do a “tune up” on my air conditioner.
What stung wasn’t just the price, but the realization that they were doing nothing more than some basic activities I could do with tools I already owned.
So I did some research and learned that most home AC maintenance is just basic cleaning and observation. No refrigerant refills, no rewiring, just simple TLC to keep the system running efficiently.
That’s when I had a lightbulb moment: Why am I paying for something I could do on a Saturday afternoon for free?
Now, I do my own AC servicing, and I haven’t called a tech in years.
Tools to Do Your Own AC Maintenance
You don’t need a full-blown mechanic’s kit to do this. Just a few simple tools — most of which you probably already own.
I’ve included links below on specific tools I use in case they’re helpful.
Tools I use to service my AC:
- Gloves and eye protection to wear (safety first)
- New air filters — I’ve found the best prices and selections for AC filters at Home Depot. Check the size of your existing one with a tape measure.
- Drill and Nut driver and to quickly remove panel covers (10mm hex screws are commonly used) Here’s the drill on Amazon I’ve used for 10 years — still going strong on the original battery! And here’s a nut driver set I use.
- Distilled white vinegar (to clean the drain line) and a funnel
- Optional: Garden hose with spray nozzle (BTW, after having issues with a lot of hoses over the years degrading or busting, our go-to is this Flexzilla hose)
- Optional: Shop vac to clean out condenser unit and drain line. We’ve had great luck with this 4 gallon Ridgid shop vac for almost a decade now.
- Optional: Foaming AC coil cleaner, only if coils are badly dirty (think caked on grime). I’ve used Frost King coil cleaner — Home Depot has the best prices ATM.
Most of these are one-time buys that’ll pay for themselves after the first skipped service call.
Change Your AC Air Filter
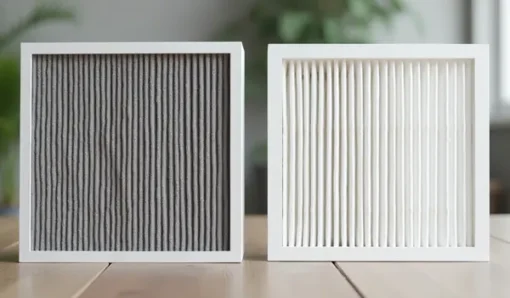
To get started, changing your air filter is the single most important task for AC maintenance, and it’s also the easiest.
Your air filter traps dust, pet hair, pollen, and other debris.
Why it matters: A dirty filter can restrict air flow to your system, causing it to work harder, shortening its life and driving up your electric bill — as much as 15% according to the US DOE.
Here’s what one ready to be replaced looks like next to a new one:
Here’s how to change your AC air filter:
1. Turn off the system at the thermostat. (where you set your temperature)
2. Locate your return vent (it’s usually the largest vent) or air handler.
3. Remove the old filter and check for airflow direction arrows.
4. Insert the new one with arrows pointing into the system.
5. Mark your calendar to change it every 3 months — adjust this as needed.
Avoid this mistake: Filters have ratings indicating how fine of particles they filter — you might see MERV, FPR, and MPR which are all similar.
The higher the number, the more particles get filtered out including allergens. But higher isn’t always better — more resistance means your blower fan has to work harder, shortening its life.
Be careful using high-MERV (>11) or equivalent FPR/MPR filters unless your system is built for it.
Personally, I’ve found MERV 8 filters good to stop dust from getting into the system while not restricting air flow. We use this HDX AC filter from Home Depot. At less than $5/each, it’s a great deal! But be sure to choose the right size for your unit.
Ready to move on to the next item? It’s even easier.
Check and Clear the AC Drain Line
Next up, treating the drain line. The drain line carries moisture your AC produces away from your evaporator coil safely out of your home.
Why it matters: A clogged drain line can cause water to back up into your home at worst, and cause your unit to shut off at best.
Here’s how to prevent your AC drain line from clogging:
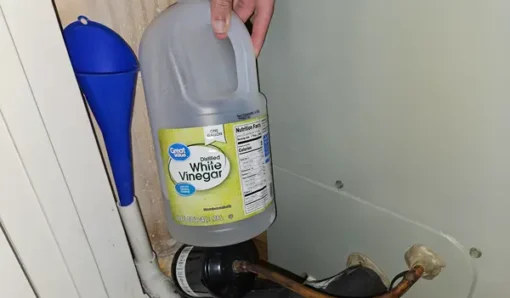
1. Find the white PVC pipe near your indoor the air handler unit.
2. Unscrew the cap on the PVC pipe, and pour in 1 cup vinegar. This helps keep algae and mold under control.
3. Mark your calendar to do this every month during warm seasons — adjust this as needed.
4. Optional: To save time, or if vinegar doesn’t quite cut it, I’ve had great luck keeping algae & mold under control with Sta-Clean Drain Strips. Just lay them in the pan, then replace every 6 mos.
But if your drain line is already clogged, pouring some vinegar in probably won’t help.
Here’s how to fix a clogged AC drain line:
1. Use a wet vac or shop vac. I’ve used this Ridgid 4 gallon vac for years.
2. Attach the hose to the PVC pipe outside your house where water from your AC usually drips out. Duct tape is helpful to make an air-tight connection.
3. Run the vacuum for a few minutes to suck out the sludge, then dump it in your garbage. Best not to look at it, it’s pretty gross.
Avoid this mistake: If your shop vac has a dry filter, be sure to remove it before using it to suction water out, or else the filter could be ruined.
Tip: Most air handlers have a sensor that shut downs the unit when the water level rises to prevent it from overflowing in your home — if yours doesn’t, be sure to get one installed!
That said, let’s move on to the next item. Don’t worry, it’s not much harder.
Clean Your Outdoor AC Condenser Unit
The AC condenser is the unit sitting outside your home, usually surrounded by leaves, dirt, and grass clippings.
It takes the heat coming from your home and dumps it outside — so keeping it clean is key, especially since it attracts dirt and pollen outdoors.
Why it matters: A dirty condenser can reduce cooling efficiency by up to 30% according to the US DOE.
Here’s how to clean the AC condenser coil:
1. *Important* — Turn off your AC at the thermostat, and for an extra precaution, turn off the power at your breaker or outside disconnect box. Be certain it’s off before proceeding! Proceed at your own risk.
2. Use a shop vac or your gloved hands to remove debris or leaves from inside the unit to allow rain water to drain out. You may need to take off the top fan grill first, which is usually held on by a few screws.
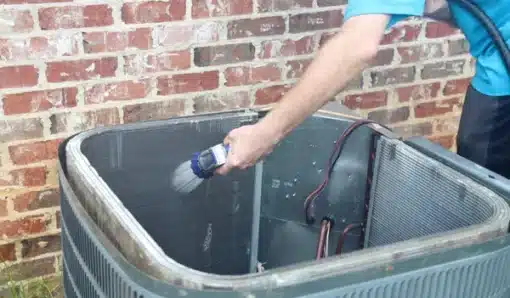
3. Optional: If the fins are really dirty (think caked on grime), you can spray no-rinse foaming coil cleaner (we use Frost King) on fins and let sit 10 mins. I’d still rinse thoroughly with water afterward anyway to be safe.
4. Gently rinse the coils from inside to out using a garden hose. Don’t spray too hard or too close — aluminum fins bend easily, and that reduces your unit’s efficiency. Then reinstall the top fan grill if you removed it.
5. Turn power back on at the breaker, then turn the system back on at thermostat.
6. Mark your calendar to do it again next year — adjust as needed.
Avoid this mistake: Don’t use a pressure washer on your condenser unit. You’ll destroy the delicate fins. Stick to a basic garden hose with a gentle spray setting.
Tip: It’s important to not block airflow to the unit, so keep at least 1 ft of clearance around it where possible, and 2 ft ideally.
Clean Your Indoor AC Evaporator Unit
Fortunately for most people, the evaporator coil doesn’t usually need routine cleaning if your system has been cared for and you’ve used high quality air filters.
But if you’ve been running low quality air filters or your system has been neglected, you may need to clean this. If so, no worries — we’ve got you.
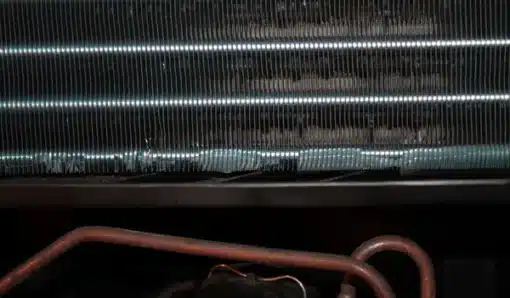
The evaporator coil is where the air gets cooled before being sent back into your rooms. It’s usually in the upper half of a rectangular box called an air handler.
Why it matters: If dust and grime build up on the coils, it becomes harder for the system to cool the air, causing longer run times and more wear and tear on your system.
Here’s how to clean the AC evaporator coil:
1. *Important* — Turn off the AC system at the breaker. Usually this turns off power to the thermostat panel as well, so that’s a good check to be sure. Proceed at your own risk.
2. Remove the panel to expose the evaporator coil fins. Panels are typically held by 10mm hex screws.
3. Check if fins are really dirty (think caked on grime). If so, you can spray no-rinse foaming coil cleaner (we use Frost King) on fins and let sit 10 mins. I’d rinse afterward with a pump sprayer or spray bottle anyway to be safe. Be careful not to bend the fins.
4. Wipe any visible grime in the drain pan or on the fins gently with a cloth, avoiding bending the fins.
While you’re in there, check for standing water in the drain pan — those are signs you may need to unclog the drain line if you haven’t already.
Avoid this mistake: Don’t skip shut-off before cleaning. Always turn off power before accessing panels — those capacitors can bite.
Bottom Line
Doing your own AC maintenance may not sound exciting, but it’s a smart financial decision for a homeowner looking to save money.
You don’t need to be an HVAC expert to do it — just someone who wants to stay cool and keep more of your cash where it belongs: in your pocket.
By learning how to clean my AC and do basic maintenance, I’ve saved almost $300/yr (see the math below), helped avoid repairs, and kept my electric bill low. Best of all, it takes only a couple hours a year — that’s almost a $150/hr return!
If you found this article helpful, be sure to sign up for our emails via the orange box. Every week, we share simple ways to save money without sacrificing your quality of life.
And if you know someone who always complains about their electric bill or a “weird smell” coming from their vents, hit a share button below and help them save too.
Savings from Maintaining Your Own AC
The math behind the savings from maintaining your own AC:
Save:
-
Avg cost of AC tune-up: $85-$200 (average $143) per this article
-
Savings from avoiding 2 AC tune-ups per year: $143/yr x 2 = $286/yr
Time Required:
- +20 mins to change AC filter up to 4 times a year (5 mins x 4/year = 20 mins)
- +20 mins to apply vinegar to drain line and vacuum line out if needed
- +20 mins to clean AC condenser yearly
- =60 mins x 2 times a year = 2 hrs/yr required to maintain your AC
Results:
- $286/yr saved
- $286 saved / 2 hrs
- =$143/hr savings rate


One response to “How to Maintain Your AC System to Save Money”
7-17-2025
SYT,
Thank you for the advice.